
Learn - Receipts
Scan a receipt and it files itself.
Receipts
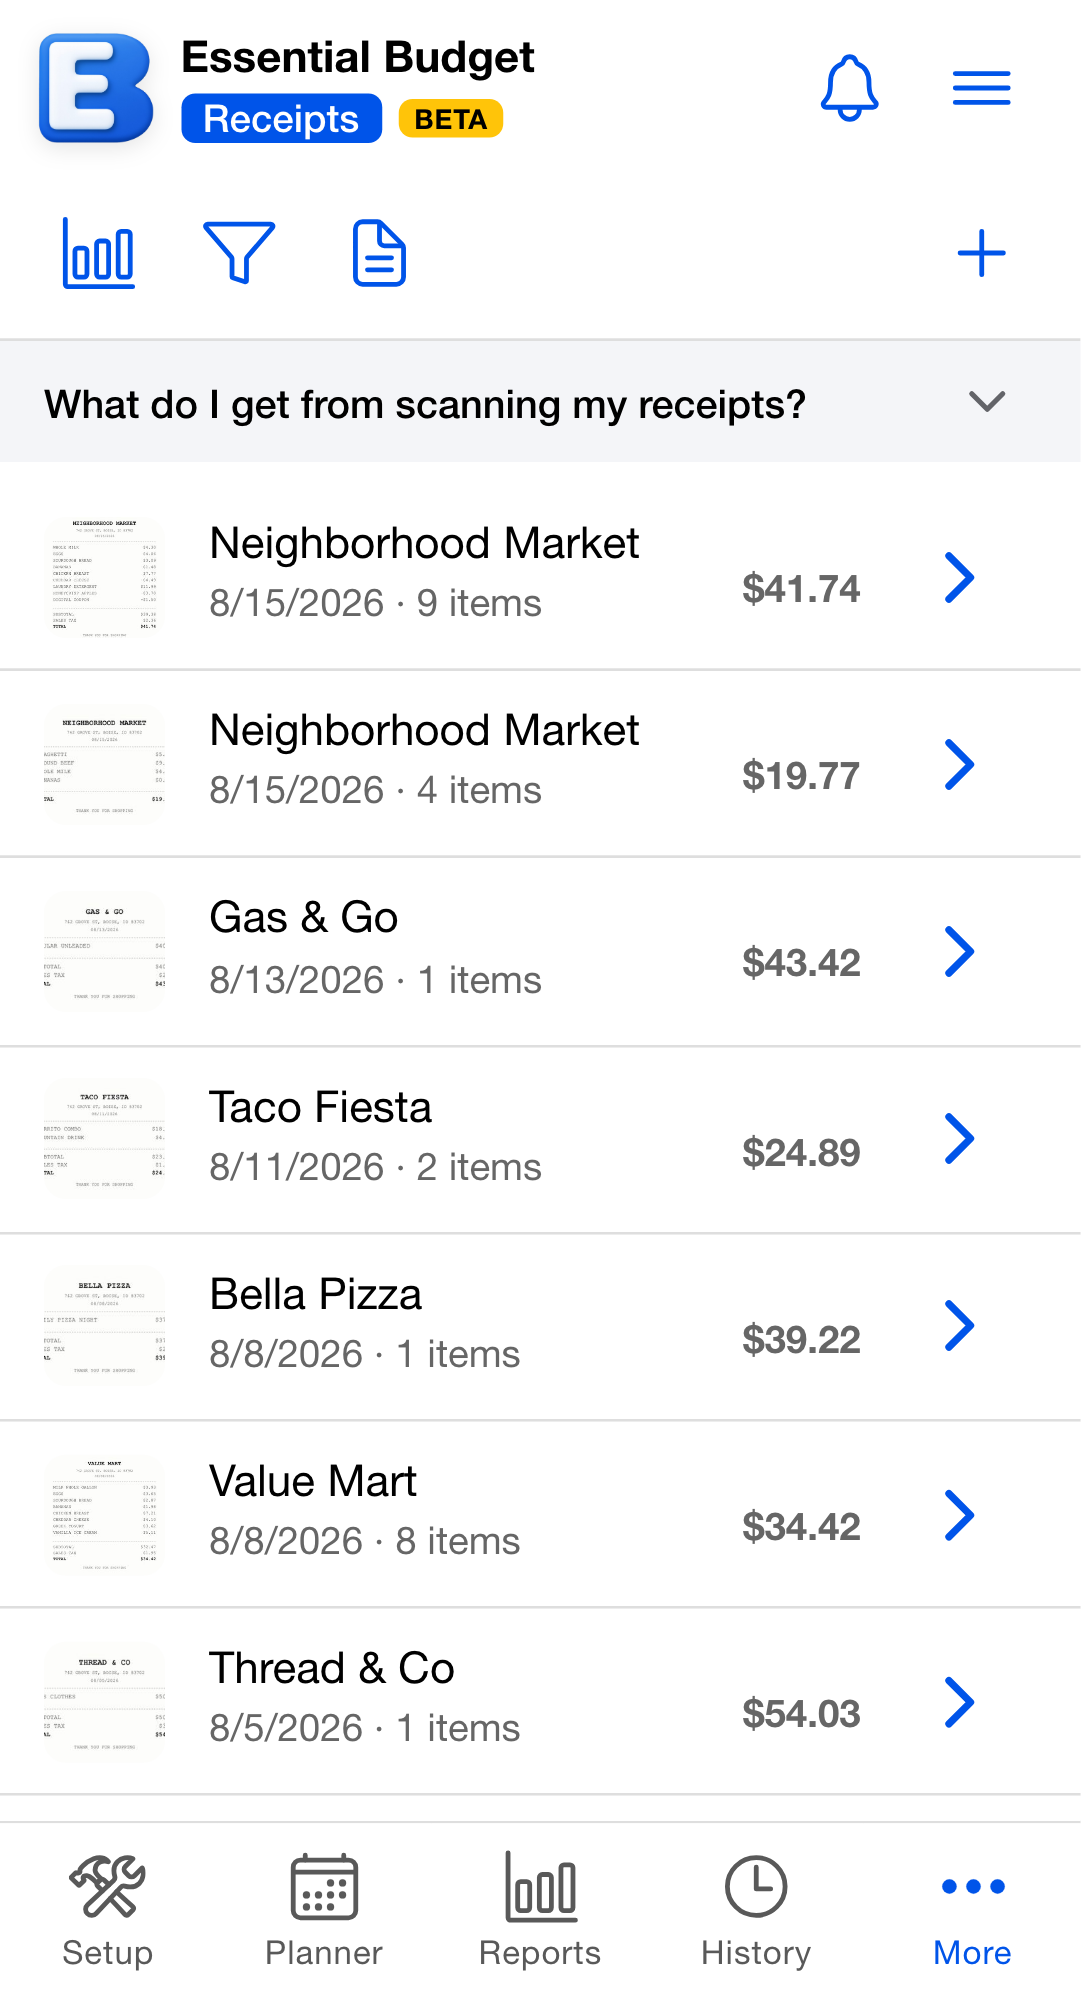
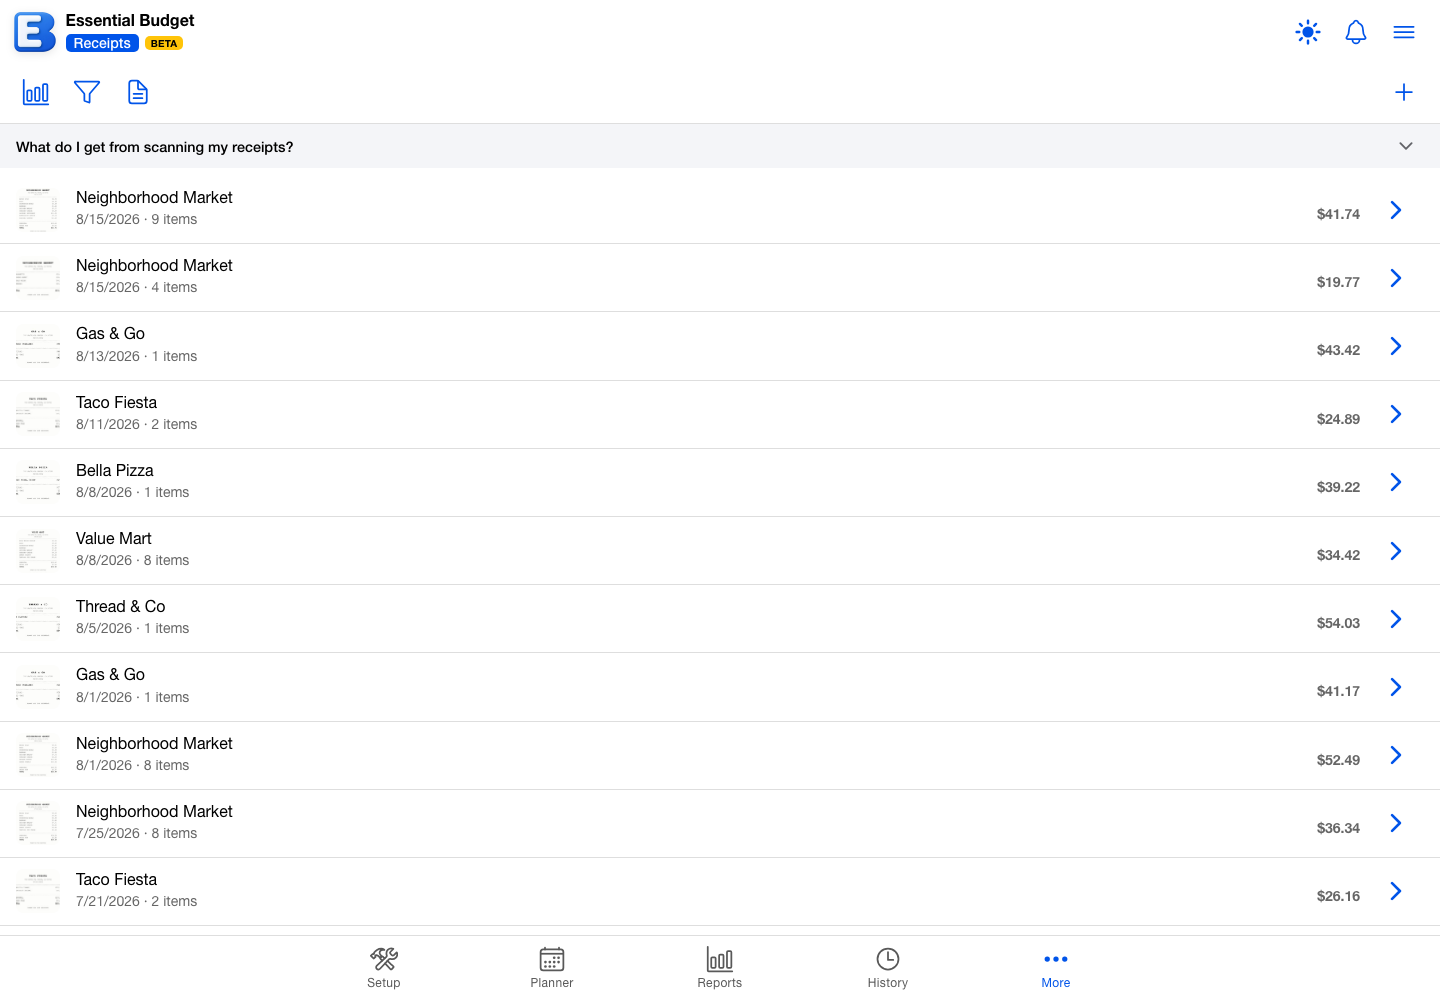
Bank feeds tell you how much you spent at the grocery store. Receipts tell you how much you spent on milk. When you scan a receipt, Essential Budget reads the merchant, the date, the totals, and every printed line item, then files the receipt to the right spot in your budget. The line items do more than keep records: they feed the receipt reports that track your prices, they build your year-end tax evidence, and they power the real prices behind your Shopping Lists and Recipes.
Free scans and Premium
Your account includes 10 free receipt scans. They are granted once, when you create your account, and they are yours until you use them: they never expire, and there is no monthly refresh. A scan only counts when the receipt is read successfully, so a failed read never uses one up. Alongside the scans, the free plan includes 20 read attempts in total: every time the app reads a receipt it uses one attempt, whether or not the read succeeds, so an unreadable photo costs an attempt but never a scan. The counts run against the person who scanned, and the Receipts toolbar keeps the scan count in view (“7 of 10 scans left”). Deleting a receipt does not return its scan. When your free scans or attempts are used up, the scan button offers to upgrade. On the free plan, the app states this allowance up front when you choose to start a budget from receipts.
Premium has no fixed scan count. Instead, scanning draws from the 500 monthly AI credits included with Premium (about 1 credit per scan), the same pool that recipe scanning and the app’s other AI tools share, so you run low only when that whole pool is used up, and you can add more with the Add 500 AI Credits pack. With a linked bank, Premium also matches every receipt to the right transaction automatically. See Subscription for how the credits work. Building a budget from your receipts with the Sync button is also part of Premium; see Receipt-Based Budgeting.
Anyone with access to the budget can view its receipts (Sharing). See Subscription for everything Premium includes.
The Sync button
In a budget created from receipts, the Receipts toolbar carries a Sync button next to Scan. Tap it whenever you want: it builds your budget from the receipts you have, or suggests updates once your budget exists. Building and syncing are part of Premium; on the free plan, tapping Sync opens the Upgrade to Premium dialog, while your included scans and every receipt report keep working. The first time you open the tab, a short callout points at it.
A sync that has new stores or products to place uses up to 15 of your monthly AI credits, and the app asks before it spends them. Once a store has been placed, it is remembered, so a sync with nothing new costs nothing. Receipt-Based Budgeting covers the whole workflow, from the first scan to keeping the amounts current.
Scanning a receipt
Open Receipts and tap the + button. In most budgets, Receipts is on the More screen; in a budget created from receipts, it is the first tab. The capture menu offers:
- Take Photo captures a receipt with your camera.
- Choose from Library appears in the iPhone and Android apps and opens your photo gallery directly. (In a phone’s web browser, Upload File or PDF covers the same job, so this entry is not shown there.)
- Upload File or PDF accepts image files and PDFs, which covers screenshots, photos saved on your device, and receipts a store emailed you. You can select several at once.
- Long Receipt (several photos) merges a receipt too long for one photo into a single scan. Shoot the receipt in sections, overlapping each one a little. After each section, the app asks “Got that part. More of this receipt?”, and you can Add Next Part (up to three) or tap Done. The merged receipt counts as one scan.
- Long Receipt (sweep) appears in a phone’s web browser when it has a camera. Instead of separate photos, you pan slowly down the receipt, and the camera captures the sections itself; they merge and count as one scan, the same as Long Receipt.
The options match your device. On a computer, the capture window is built around uploading: drag a receipt image or PDF onto it, or click to browse. You can also drop a file anywhere on the Receipts page. Take Photo appears on a computer only when it has a camera.
When you take a photo with the app’s built-in camera in a web browser, the photo opens with a crop box already placed around the receipt, and a hint reads “Drag the corners to trim out the background. Keep the whole receipt inside the box.” Adjust the box if the detection missed, or drag it out to the edges to keep the full picture. Tap Check focus to zoom in and confirm the text is sharp (“Pinch to zoom in and check the text is sharp.”); Back returns to the crop box. When the framing looks right, tap Use photo to upload the framed area, or Retake to shoot again. When you shoot a Long Receipt this way, each section opens the same crop step; keep the overlapping edges inside the box so the sections still line up. On the iPhone and Android apps, Take Photo opens your phone’s own camera instead.
Selecting several files at once is the way to catch up on a stack of receipts: each one uploads in the background and files itself while you keep going. When you bring in a larger stack (about five or more photos), the app gathers the batch into a Backfill screen that sorts it for you:
- Saved: receipts that parsed and filed automatically.
- Needs review: receipts waiting for a second look.
- Possible duplicates: likely repeats you can discard together.
- Failed: kept so you can retry them without re-uploading.
- Matched events: suggested links you can accept in one tap.
The moment a receipt uploads, it appears in your list with a short “Reading receipt…” indicator. A few seconds later, the parsed details replace it. You never wait on a spinner to keep scanning.
An obviously bad photo (too blurry, washed out by glare, or with the receipt running off the edge of the frame) is caught on your device before it uploads: a short message explains the problem (“That photo is too blurry to read. Hold the phone steady, tap the receipt to focus, then retake it.”) so you can retake it. A photo caught this way costs nothing, on any plan.
When an uploaded receipt still cannot be read well enough to file (the print is unreadable, or the date or total is cut off), nothing is saved. A short message tells you, so you can scan again with a clearer photo. A technical problem on the app’s side works differently: the receipt is kept in your list marked “Scan failed”, so you can retry it without re-uploading. Neither kind of failure uses one of your scans; on the free plan, a read that reached the app does use one of your 20 attempts.
Importing an emailed or electronic receipt
Many stores can email you a receipt or let you save one as a PDF. You can bring those files straight into Essential Budget without taking a photo: tap the + button, choose Upload File or PDF, and pick the file. A PDF can be up to 15 pages long. On a computer, you can also drag the file straight onto the Receipts page.
A PDF is read as a document, so the text is captured exactly as the store printed it. That makes the merchant, date, totals, and line items especially accurate. An online order with no store address leaves the location blank.
An imported file is scanned the same way as a photo. On the free plan, it uses one of your free scans; on Premium, it draws from the monthly AI credits like any other scan. Once the file is in, it files itself, links to events, itemizes, and feeds your reports exactly like a scanned receipt.
Sorting and filtering the list
After a backfill, a budget can hold thousands of receipts. The list shows the most recent first and loads more as you scroll, so even a long history opens quickly. To sort or narrow the list, tap Filter at the top of the tab.
Sort by Date (newest first by default), Amount, or Merchant, and flip the Order (for example, Highest first or Oldest first). Filter by:
- Linking: only receipts linked to an event, only those filed to history, or only the ones not linked yet.
- Merchant: type part of a store name.
- Not itemized: receipts with no line items, so you can find the ones to itemize before a tax report.
- Needs review: receipts still waiting for a second look.
Tap Apply to set the view, or Clear all to return to the full list. While a filter is on, the Filter button’s label changes to Filters on. Sorting and filtering run on the server, so they cover your whole history, not just the receipts already on screen.
Automatic filing
A receipt that reads cleanly files itself. When it clearly matches one of your planned events, it also links automatically. After a small batch, a toast reads “Saved and linked:” followed by the store name, with View and Undo buttons; after a single scan, the app opens straight to the receipt instead. Missing the toast costs nothing: automatic linking never changes any balance, the receipt carries a “New” badge until you look at it, and you can unlink it from the receipt’s detail screen for as long as its event is open.
Why doesn’t automatic linking change any numbers? Linking is a filing action, not a bookkeeping one. The receipt attaches to the event as proof of the purchase, while the event’s own transaction carries the amount. A link the app got wrong can never move money; unlinking simply removes the attachment.
A receipt that needs a second look is flagged instead. The common reasons are a photo that was hard to read, totals that did not add up, or a receipt that looks like one you already scanned. Find flagged receipts with the Needs review filter (see Sorting and filtering the list). Saving a flagged receipt from its detail page clears the flag: saving it unchanged always clears it, and saving corrections clears it once the numbers add up. A correction that still does not add up stays flagged.
Linking receipts to events
Open any receipt to see its details. The app suggests the best match by checking, in order: transactions already in your budget, merchants you have linked before, and open events with a matching amount and date. The suggestion reads Link to followed by the budget flow (the part of your budget you track spending against, such as Groceries), with a short reason underneath: “Matches a bank transaction”, “You linked this merchant here before”, or “Matches this event”. One tap on Link accepts it.
Linking attaches the receipt as a record of the purchase. It never changes a balance: the receipt sits alongside the event as proof of what you bought, while the event’s own transaction carries the amount. When you want the receipt’s line items to become transactions in your budget, use Adding an itemized receipt to your budget below.
A linked receipt shows Linked to followed by the flow’s name, with a one-tap Unlink button; a receipt on an event that has already resolved reads Linked to the flow with (resolved) after it, and its Unlink button stays disabled until you undo the resolve in History. After you link the same store to the same flow twice (and the flow is not already matched to a bank name), the app offers a one-tap chip (“Always match Costco to Groceries?”), and from then on receipts from that store link on their own.
A receipt with no good match saves unlinked. That is a normal state, not an error, and the list says nothing about it: a badge appears only once a receipt IS linked, and it names the flow it is linked to (for example “Linked to Groceries”). Linking is optional. Plenty of people scan receipts only for the reports, the shopping lists, and recipe costs, and never link anything. Open a receipt again after the matching bank transaction arrives, and a fresh one-tap Link suggestion is waiting on its detail page.
Linked receipts show up in both directions: the event’s edit screen lists its receipts, and a resolved event’s History entry shows them too. You can also scan directly from an event or from History detail, and the new receipt links to that spot immediately.
Line items
Each scanned receipt captures its printed line items: the raw text, a readable name, a quantity, and a price. The receipt row shows an item count (“12 items”), or “Not itemized” when none were read.
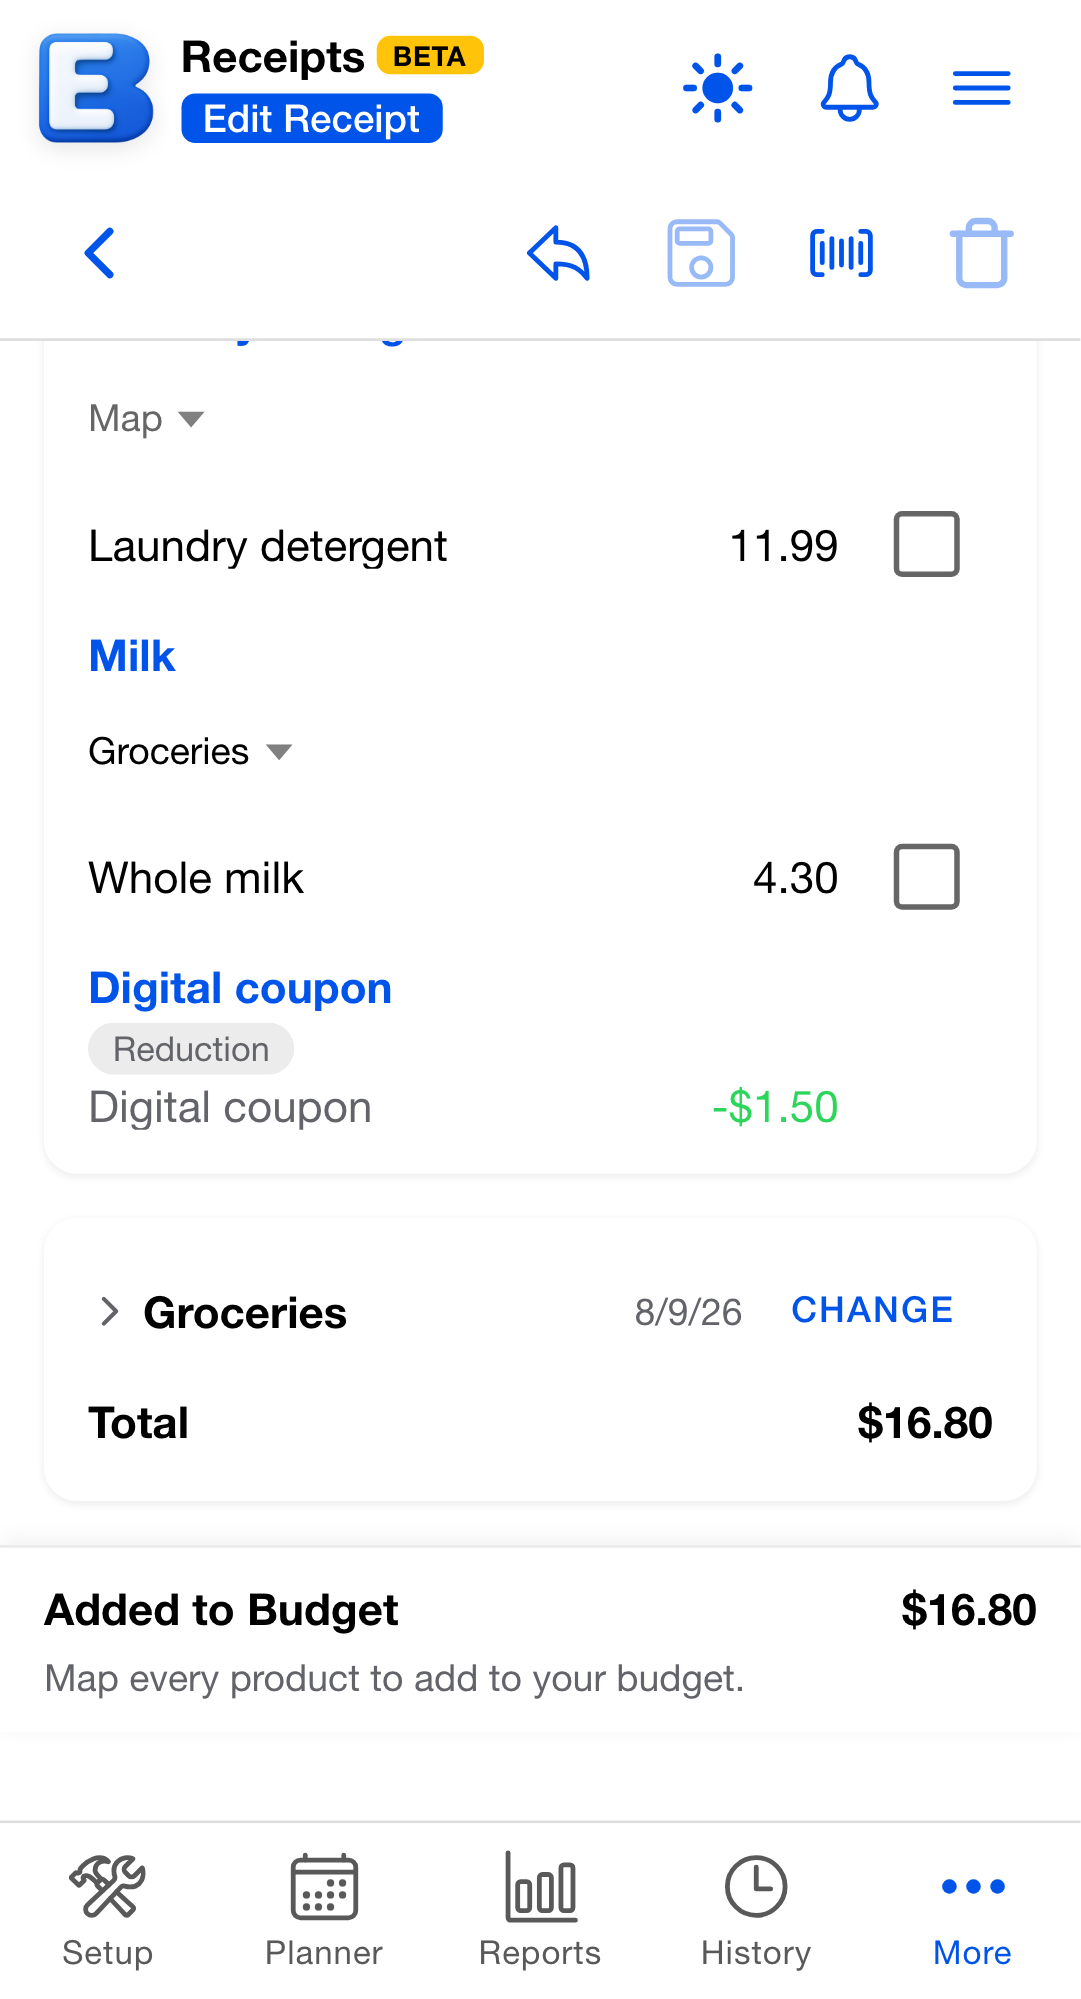
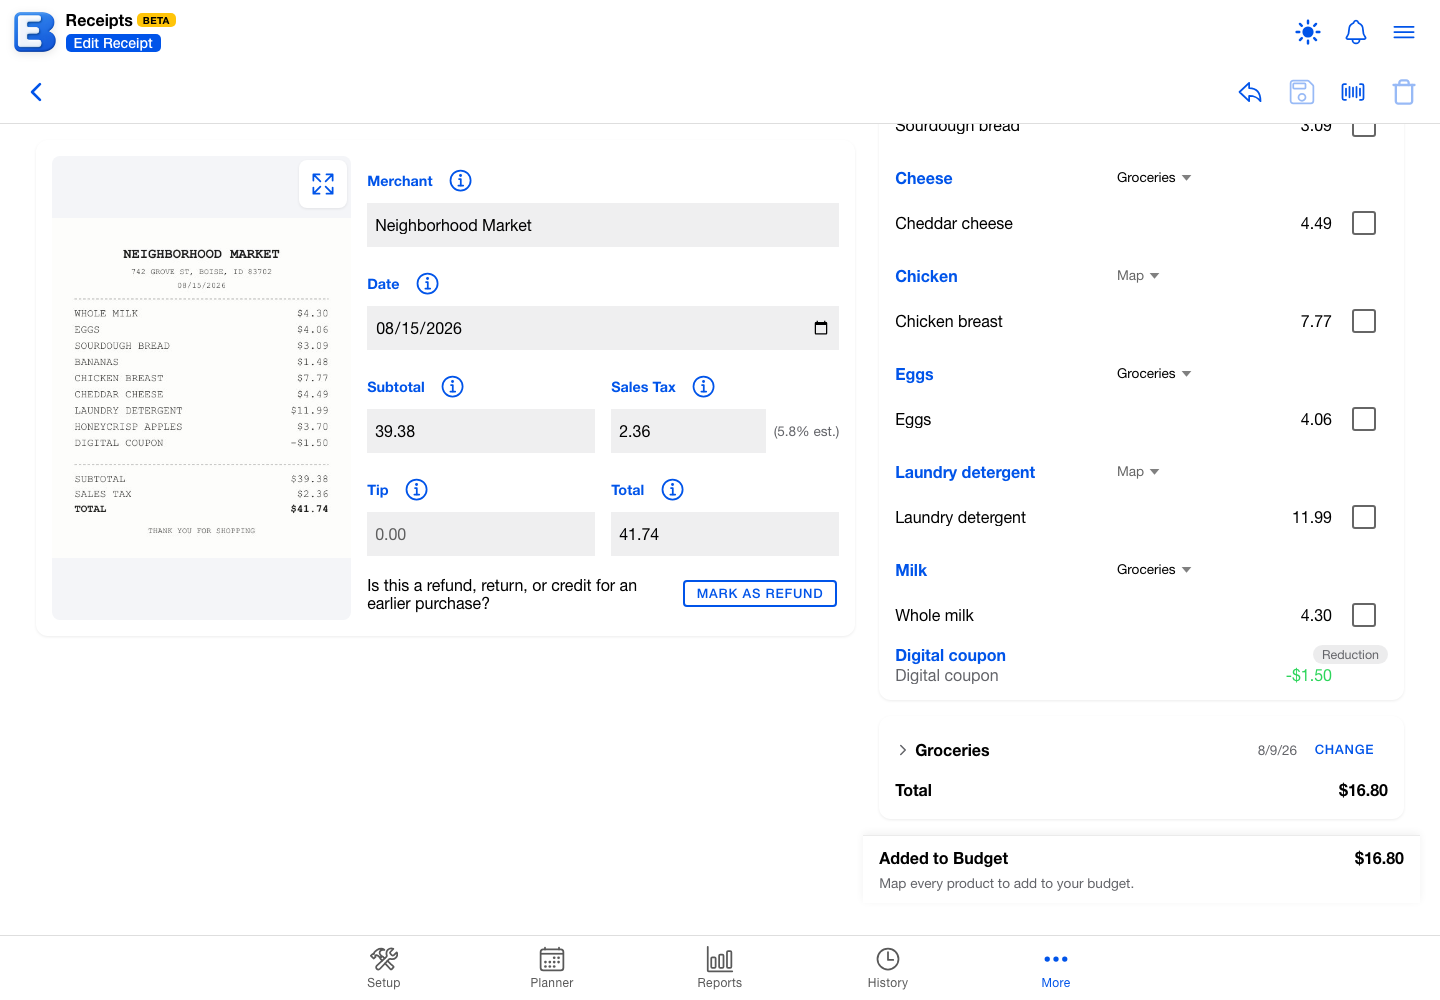
When you open a receipt, one Receipt Line Items card holds every line: beside the receipt on a wide screen, below it on a phone. Products are listed alphabetically with their prices, and each row carries its status:
- a ”→ flow” chip once the product is mapped to your budget (an unmapped product shows no chip; the header count tracks what remains),
- a check mark in the “Ded” column on lines you marked deductible,
- and a “Reduction” chip on discounts.
The card header counts the receipt for you (“6 items · 2 of 3 mapped”), and once you have marked deductible lines, it totals them there too (“Deductible: $12.40”). Mapped rows stay in the list; mapping only changes the chip.
When a receipt rang the same product up more than once at the same price, those lines collapse into a single row with a quantity: the product name with “2 × $4.36” beneath it, and the combined $8.72 on the right. When the printed names or prices differ, the printed lines stay listed beneath the row. The grouping is for reading only; the amount added to your budget is the same either way.
To edit the line items, start editing the receipt (the pencil in the toolbar). The same card turns each line into editable fields: a name, a price, and a deductible checkbox in the “Ded” column, plus a Map picker on each product. Fix names or prices, check the box on each line you can deduct (see Taxes and Deductibles), and map products to budget flows. Your edits save with everything else when you tap Save in the toolbar.
A discount, coupon, or rebate the scan detects is shown as a reduction, with a leading minus, and left out of the deductible total, since a reduction is never tax deductible; its Deductible box is disabled.
Where a printed name leaves you unsure which product a line was, scan the package: photograph its front, check the name the app reads off it, and scan the barcode onto that line. The line then shows the product’s name and a small picture of it. Reading the barcode costs nothing; reading the package photo uses AI credits, never one of your receipt scans. See Scanning Barcodes.
Names you fix are remembered
Registers print short, abbreviated product names, and the scan works out a readable name from them. When it gets one wrong, correct it and the app remembers what you call that product. The next receipt with the same product uses your name instead of guessing again.
Where a store prints a barcode next to each item, the correction is remembered against that barcode. Most stores do not print one, so the correction is remembered against the store and the printed description together, which stays the same from one visit to the next. Either way it works without you doing anything beyond fixing the name once.
A remembered name follows you, not the budget: fix it once, and every budget you open uses it. Nobody else sees your names, with one exception. A name you fix inside a shared budget also becomes that budget’s, so the people you share it with see it as well, unless they have named the product themselves. A name you fix in a budget of your own never reaches anyone else, even when two shoppers buy exactly the same product.
Lines showing a name you taught the app carry a small Your name mark, so you can tell at a glance which names came from you and which the scan worked out on its own. A line whose name came from a scanned package carries a Scanned mark instead; see Scanning Barcodes.
A correction reaches receipts you already scanned
Fixing a name also updates how that product reads on earlier receipts, so you do not have to go back and correct the same item again on each one.
Only the name changes. Every amount stays exactly as it was scanned: prices, quantities, totals, and anything already added to your budget are untouched, and your reports show the same figures before and after. If you would rather a line went back to the scanned name, clear the name you gave it.
Adding an itemized receipt to your budget
Linking files a receipt next to an event. To turn the receipt’s line items into real transactions, map each scanned product to a budget flow, and the app adds what you spent to your budget, divided across those flows the way the receipt was rung up. The Receipt Line Items card always shows where you stand: mapped products carry their ”→ flow” chips, and the header keeps count of the rest (“6 items · 2 of 3 mapped”).
To map, start editing the receipt (the pencil in the toolbar). The mapping controls appear inside the same card, so there is no separate list to work through. Each product gains its own Map picker; choose the budget flow it belongs to, and the product stays in the list with its mapping shown. Map products one at a time, or use Map all to send every remaining product to a single flow. On Premium, Auto-map with AI fills in the products it can match confidently and tells you how many are left (“Mapped 4 of 6 with AI. Map the rest from the list.”); free members see “Premium maps every product in one tap.”, and the button opens the upgrade screen.
The picker lists your expense flows in one alphabetical list; a receipt line is a purchase, so income and transfer flows are not offered. You can pick any of them, since every event can hold transactions. The Move control uses the same list.
As you map, the products gather into one card per budget flow, listed alphabetically by flow name. A card opens collapsed, showing its flow and total; tap it to expand. Expanded, each flow’s card shows:
- the flow and the open event the cost will be added to, with a Change button to send it to a different open event for that flow;
- the product lines;
- a Receipt taxes/fees line, which spreads the receipt’s tax, tip, and fees across the flows by price;
- and a Total.
On a wide screen, the receipt sits beside the cards and stays in view while you scroll, so you can check the mapping against the receipt itself. The footer keeps a running Added to Budget total. To move a product to a different budget flow, use the Move control on its line; the product joins the chosen flow’s card, and the totals update.
The app proposes the event whose period covers the receipt’s purchase date. When the flow has open events but none covers that date (say the covering one already resolved), the card names the date, for example “No open event covers Jun 15, 2026”, and Change lets you pick any of the flow’s open events instead. A card reading “The receipt has no date; pick an event” means the scan found no purchase date, and “No open events for this flow” means the flow has nothing open to receive the cost.
One Save in the toolbar commits everything: it saves any edits to the receipt fields, adds the mapped products to your budget, and stays on the page so you can see the result land (“Receipt added to your budget.”). Save turns on whenever you have unsaved work, whether that is an edited field or a single mapped product. Adding to the budget needs every product mapped; saving a partial mapping keeps your progress (“Receipt saved.”) without posting anything to the budget.
When you leave with unsaved work, the app prompts “Discard Changes?” first, and the toolbar’s cancel arrow does the same; canceling with nothing changed simply leaves edit mode. A receipt you have already added reads “This receipt is in your budget. Change a group to update it.” Changing a mapping turns Save back on, and saving again confirms with “Budget updated.”
The amounts a receipt adds show up as transactions on their events, and they are read-only there: the event’s edit dialog shows a receipt icon on those rows instead of edit and delete controls, and tapping the icon brings you back to the receipt. Changing the mapping here is the one place those amounts change. See Transactions that came from a receipt.
When part of a receipt is filed to History
Resolving an event files it to History, and History never changes. An event on a flow due on a single date resolves as soon as a receipt posts to it; an event on a flow due over a date range resolves once the amounts on it reach what you budgeted. Either way, saving a receipt can complete an event right then.
When an event holding amounts from a receipt resolves, that receipt’s mapping locks. A notice reads “Part of this receipt is in completed events filed to History, marked below. No action is needed, but the split can no longer be changed. To change it, first undo those events in History.” Each affected card carries a “Filed to History” badge, so you can see exactly which flows are in a completed event, and the mapping controls become read-only. Your receipt and your budget are fine as they are; the receipt’s own details (merchant, date, totals, line items) stay editable.
To change how a filed receipt is split, open History (a tab in most budgets; under More in a budget created from receipts) and undo the resolved event; its transactions return to the open event. Then come back to the receipt, change the mapping, tap Save, and resolve the event again when you are done. This keeps your History an exact record: nothing filed there is ever rewritten behind your back.
When the bank transaction arrives later
If you added an itemized receipt to your budget and the same purchase later arrives from your bank, Essential Budget notices the likely duplicate during transaction matching. It shows the two together in a “Possible duplicate” card, with the bank charge above the receipt you scanned. When you choose It’s the Same Purchase, the app marks the bank charge as already accounted for, so nothing is counted twice; this creates or removes no transactions and changes none of your numbers (a tip difference, if any, is shown for context but not added). Choose Keep Both if they really are two purchases. Nothing merges silently.
Receipts and your budget’s lifecycle
Receipts never get lost when your budget changes:
- When you edit a schedule’s timing or delete an event, its receipts unlink; they stay in your list, ready to relink.
- Resolving an event keeps its receipts attached to the History entry. Undoing the resolve restores the link to the open event, and it unlocks the receipt’s mapping if the receipt had been filed (see When part of a receipt is filed to History).
- Deleting a receipt you added to your budget asks whether to keep its transactions or remove them; removing them restores the balances. Kept transactions become ordinary transactions you can edit on their events.
Backups and shared budgets
Budget backups include your receipts, their line items, and learned merchant matches, but not the receipt images themselves. Restored receipts arrive unlinked, because a restore rebuilds your budget’s events from scratch. Their parsed data and line items are intact, but with no image, each one shows an “Image unavailable” placeholder. Relink them as you would any unlinked receipt.
In a shared budget, everyone can see receipts and their details. Scanning and linking need edit permission, and deductible flags are visible to all members, like any other receipt detail.
Questions or feedback about this page?Email us.